
Creating and managing a shared drive
Need Additional Help? If you need further assistance after reading this article, please contact the IT helpdesk via email at techsupport@baypath.edu or by phone at (413)565-1487.
Create a shared drive
Shared Drive creation is managed by IT. If you need a shared drive created, please reach out to the IT helpdesk for assistance.
What members can do at different access levels
Access Level | |||||
|---|---|---|---|---|---|
Permission | Manager | Content manager | Contributor | Commenter | Viewer |
Can view files and folders |
|
|
|
|
|
Can comment on files |
|
|
|
| |
Can edit files |
|
|
| ||
Can create and add files, can create folders |
|
|
| ||
Can add and remove people and groups on specific files |
|
|
| ||
Can restore files from the Trash (up to 30 days) |
|
|
| ||
Can move files from My Drive to a shared drive |
|
|
| ||
Can move files and folders to the Trash |
|
| |||
Can move files and folders within a shared drive |
|
| |||
Can add or remove people and groups on specific folders in a shared drive |
|
| |||
Can move folders from My Drive to a shared drive |
| ||||
Can move files from one shared drive to another shared drive |
| ||||
Can add or remove members of a shared drive |
| ||||
Can change member access levels |
| ||||
Can permanently delete files in the Trash |
| ||||
Can rename or change theme |
| ||||
Can delete the shared drive |
| ||||
Add members to a shared drive
Requires manager access
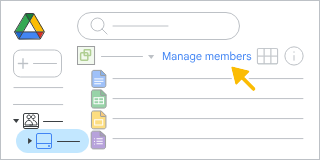
In the left column, click Shared drives and double-click one of your shared drives.
At the top, click Manage members.
Add names, email addresses, or a Google Group.
By default, new members will be Content managers. They can upload, edit, move, or delete all files.
To change the role for a new member, select a role from the dropdown.
To choose to notify new members of their access, click Notify people.
Click Send.
Change a member’s access to a shared drive
Requires manager access
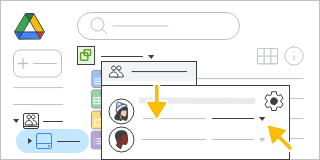
On the left, click a shared drive.
At the top, next to the shared drive name, click the Down arrow → Manage members.
Next to a member’s name, click the Down arrow and select a new access level.
Click Done.