
How to Complete the Employee Data Verification Checklist in Paycom
Need Additional Help? If you need further assistance after reading this article, please contact the IT helpdesk via email at techsupport@baypath.edu or by phone at (413)565-1487.
Accessing the Checklist
From a web browser, sign in to Paycom.
If you need a reminder, here are the instructions for how to do so.
Select the notification bell icon in the upper-right corner of the screen.
.png?inst-v=e116c39b-89d6-4ec9-96ed-7cbaf10ae80d)
Select the notification that says Employee Data Verification Checklist.
.png?inst-v=e116c39b-89d6-4ec9-96ed-7cbaf10ae80d)
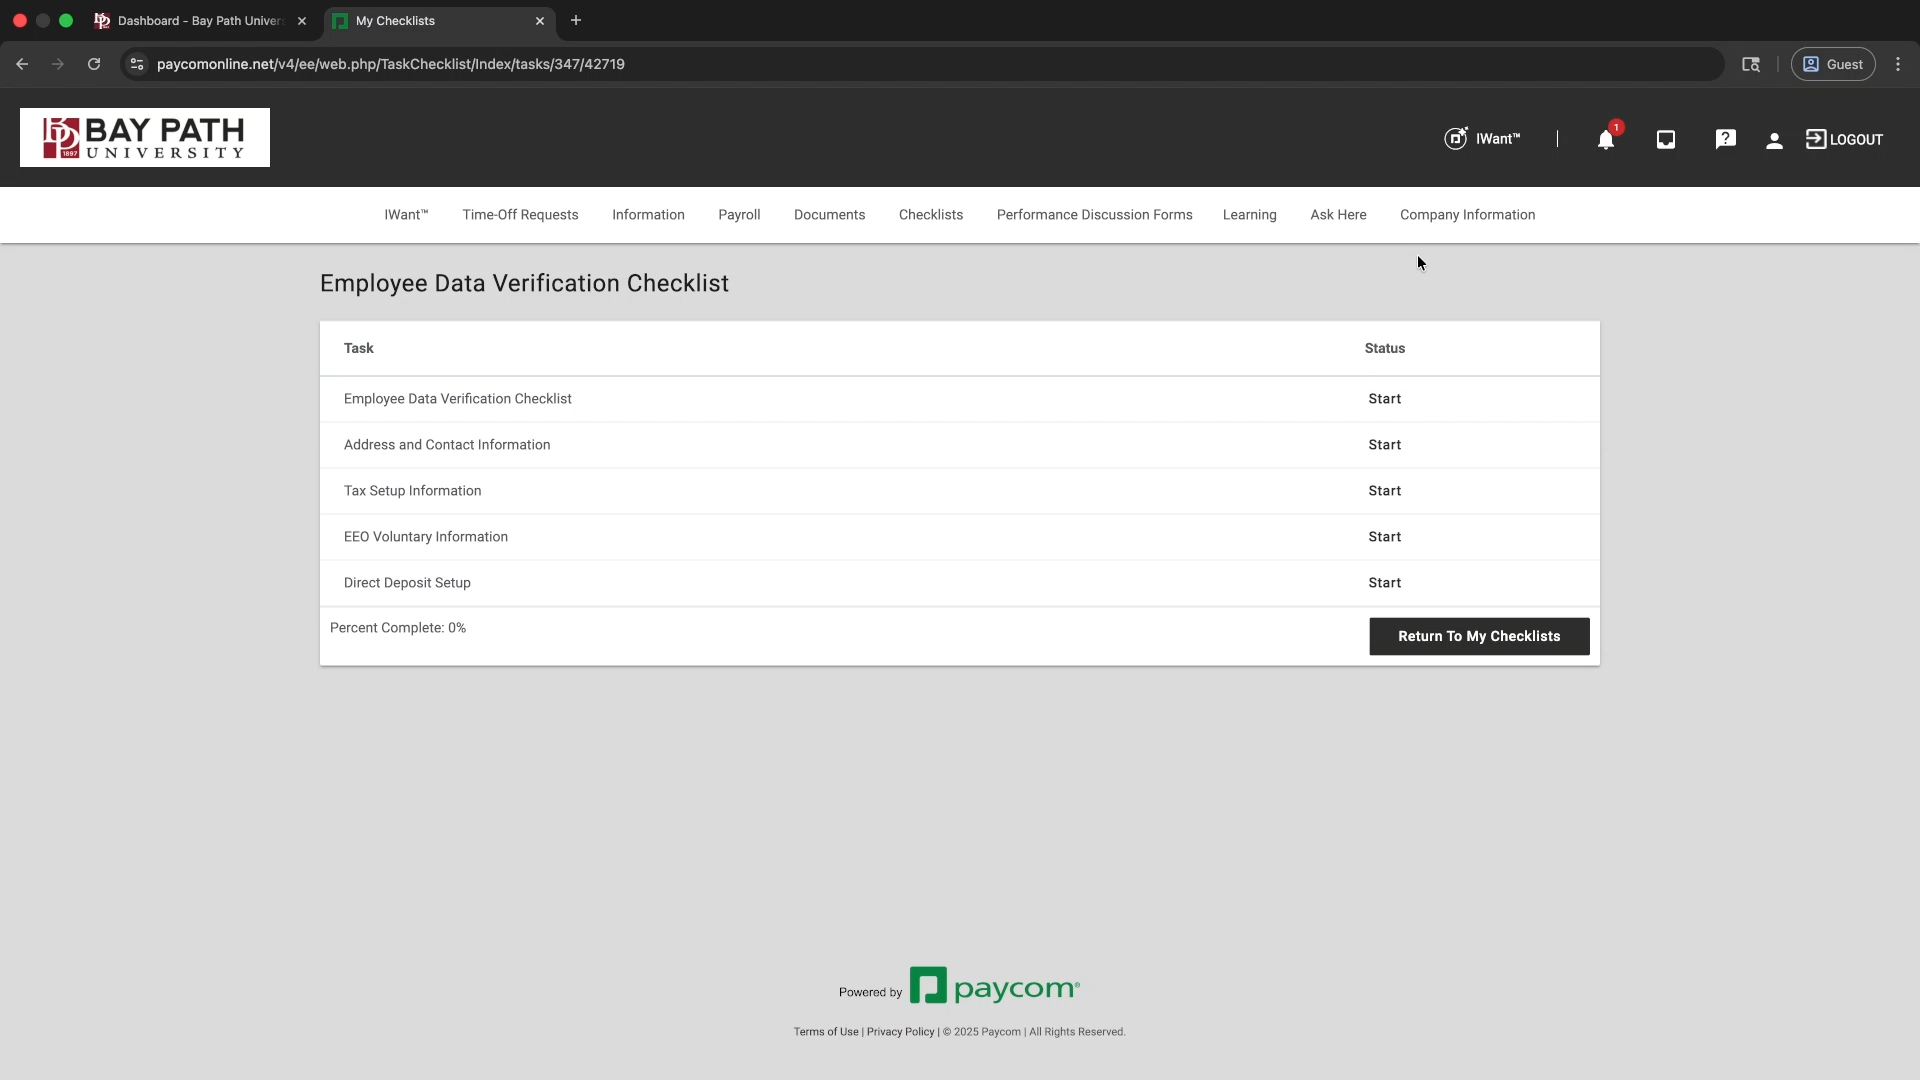
You will see the checklist with the different tasks. Select Start to open each task.
Employee Data Verification Checklist Task
Select Start next to the Employee Data Verification Checklist task.
.png?inst-v=e116c39b-89d6-4ec9-96ed-7cbaf10ae80d)
Read the acknowledgement and then select Acknowledge.
.png?inst-v=e116c39b-89d6-4ec9-96ed-7cbaf10ae80d)
You will be redirected back to the checklist.
Address and Contact Information Task
Select Start next to the Address and Contact Information task.
.png?inst-v=e116c39b-89d6-4ec9-96ed-7cbaf10ae80d)
A window with instructions will pop up. After reading, select Start.
.png?inst-v=e116c39b-89d6-4ec9-96ed-7cbaf10ae80d)
Verify that your email address, phone number, and emergency contacts are correct.
Under Phone Number, enter your country code and 10-digit phone number. Select the phone type.
.png?inst-v=e116c39b-89d6-4ec9-96ed-7cbaf10ae80d)
You will need to verify your phone number after adding it. Here are the instructions for verifying your phone number.
Under Addresses, make any necessary changes.
Under Emergency Contacts, select Add Emergency Contact.
.png?inst-v=e116c39b-89d6-4ec9-96ed-7cbaf10ae80d)
Enter the emergency contact information, then select Add.
Select Update at the bottom of the page.
.png?inst-v=e116c39b-89d6-4ec9-96ed-7cbaf10ae80d)
You will be redirected back to the checklist.
Tax Setup Information Task
Select Start next to the Tax Setup Information task.
.png?inst-v=e116c39b-89d6-4ec9-96ed-7cbaf10ae80d)
A window with instructions will pop up. After reading, select Start.
.png?inst-v=e116c39b-89d6-4ec9-96ed-7cbaf10ae80d)
On the Federal tab, ensure the information is correct.
.png?inst-v=e116c39b-89d6-4ec9-96ed-7cbaf10ae80d)
Select the State/Local tab. You will see each state for which you have tax information.
.png?inst-v=e116c39b-89d6-4ec9-96ed-7cbaf10ae80d)
Select each state’s subtab, and ensure the information is correct.
Once you are finished, select Acknowledge and Sign at the bottom of the page.
.png?inst-v=e116c39b-89d6-4ec9-96ed-7cbaf10ae80d)
On the Confirm pop-up, ensure that the information is correct. Then, select Sign.
.png?inst-v=e116c39b-89d6-4ec9-96ed-7cbaf10ae80d)
On the Sign [Form W-4] pop-up, check the box next to “Under penalties of perjury, I declare that I have examined the information provided and, to the best of my knowledge and belief, it is true, correct, and complete.”
.png?inst-v=e116c39b-89d6-4ec9-96ed-7cbaf10ae80d)
When you check the box, you will be prompted to sign. Select Type in to type your signature.
.png?inst-v=e116c39b-89d6-4ec9-96ed-7cbaf10ae80d)
Enter your full name in the Your Name: field.
Select Sign when finished.
.png?inst-v=e116c39b-89d6-4ec9-96ed-7cbaf10ae80d)
You will be redirected back to the checklist.
EEO Voluntary Information Task
Select Start next to the EEO Voluntary Information task.
.png?inst-v=e116c39b-89d6-4ec9-96ed-7cbaf10ae80d)
A window with instructions will pop up. After reading, select Start.
.png?inst-v=e116c39b-89d6-4ec9-96ed-7cbaf10ae80d)
Check the appropriate boxes in the Gender and Race/Ethnicity sections.
.png?inst-v=e116c39b-89d6-4ec9-96ed-7cbaf10ae80d)
Under Disability Status, select View Invitation to Self-Identify.
.png?inst-v=e116c39b-89d6-4ec9-96ed-7cbaf10ae80d)
If you see a pop-up that says Leave site? select Leave.
.png?inst-v=e116c39b-89d6-4ec9-96ed-7cbaf10ae80d)
A new page will open.
Check the appropriate box, then select Save and Submit.
.png?inst-v=e116c39b-89d6-4ec9-96ed-7cbaf10ae80d)
On the Sign [Voluntary Self-Identification of Disability (Form CC-305)] pop-up, check the box after reading the acknowledgement.
.png?inst-v=e116c39b-89d6-4ec9-96ed-7cbaf10ae80d)
When you check the box, you will be prompted to sign.
Select Type in. Your signature from the previous step was saved.
.png?inst-v=e116c39b-89d6-4ec9-96ed-7cbaf10ae80d)
Select Sign.
.png?inst-v=e116c39b-89d6-4ec9-96ed-7cbaf10ae80d)
Under Protected Veteran Status, select View Invitation to Self-Identify.
.png?inst-v=e116c39b-89d6-4ec9-96ed-7cbaf10ae80d)
A new page will open.
Enter the appropriate information, then select Save and Submit.
.png?inst-v=e116c39b-89d6-4ec9-96ed-7cbaf10ae80d)
On the Sign [Veteran Invitation to Self ID Veteran Status (VETS 4212)] pop-up, check the box after reading the acknowledgement.
.png?inst-v=e116c39b-89d6-4ec9-96ed-7cbaf10ae80d)
When you check the box, you will be prompted to sign.
Select Type in. Your signature from the previous step was saved.
.png?inst-v=e116c39b-89d6-4ec9-96ed-7cbaf10ae80d)
Select Sign.
.png?inst-v=e116c39b-89d6-4ec9-96ed-7cbaf10ae80d)
Once finished, select Update.
.png?inst-v=e116c39b-89d6-4ec9-96ed-7cbaf10ae80d)
You will be redirected back to the checklist.
Direct Deposit Setup Task
Select Start next to the Direct Deposit Setup task.
.png?inst-v=e116c39b-89d6-4ec9-96ed-7cbaf10ae80d)
A window with instructions will pop up. After reading, select Start.
.png?inst-v=e116c39b-89d6-4ec9-96ed-7cbaf10ae80d)
Ensure that the information is correct.
When finished, select Approve and Sign.
.png?inst-v=e116c39b-89d6-4ec9-96ed-7cbaf10ae80d)
On the Acknowledge and Sign pop-up, check the box after reading the acknowledgment.
.png?inst-v=e116c39b-89d6-4ec9-96ed-7cbaf10ae80d)
When you check the box, you will be prompted to sign.
Select Type to type your signature.
.png?inst-v=e116c39b-89d6-4ec9-96ed-7cbaf10ae80d)
Type your full name in the Click Here to Type field.
Select Sign.
.png?inst-v=e116c39b-89d6-4ec9-96ed-7cbaf10ae80d)
You will be prompted for Two-Factor Authentication. Select the method to receive the authentication code, then select Next.
.png?inst-v=e116c39b-89d6-4ec9-96ed-7cbaf10ae80d)
Enter the code you received in the 6-Digit Verification Code field. Select Submit.
.png?inst-v=e116c39b-89d6-4ec9-96ed-7cbaf10ae80d)
You will be redirected back to the checklist.
You have now finished your checklist!