
Organize & archive email
Need Additional Help? If you need further assistance after reading this article, please contact the IT helpdesk via email at techsupport@baypath.edu or by phone at (413)565-1487.
In Gmail, use labels and filters to organize your email. You can also star, snooze, archive, and delete messages to keep your inbox clear.
Organize Email
In Outlook: Use folders, rules, and categories.
In Gmail: Use labels and search filters (Gmail doesn't use folders). You can drag messages into labels, similar to the way you drag items into folders. Also, you can apply multiple labels to a message, and find messages by clicking any of their labels in the left panel.
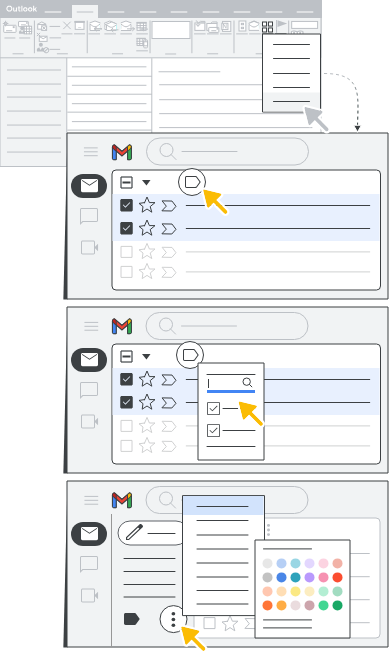
Create a label
On the left, scroll down, then click More
Click Create new label.
Name your label.
Click Create.
Label messages in your inbox
Select the messages you would like to apply a label to
At the top, click Labels.
Select a label, or create a new one.
To apply a label to multiple messages at the same time, check the boxes to the left of the messages, then choose a label above the inbox.
Create a filter
In the search box at the top, click Show search options.
Enter your search criteria. If you want to check that your search worked correctly, see what emails show up by clicking Search.
At the bottom of the search window, click Create filter.
Choose what you’d like the filter to do.
Click Create filter.
When you create a filter to forward messages, only new messages will be affected. Additionally, when someone replies to a message you've filtered, the reply will only be filtered if it meets the same search criteria.
Mark email for follow-up
In Outlook: Use flags to track important messages you receive.
In Gmail: Star, snooze, or mark messages you receive as important.
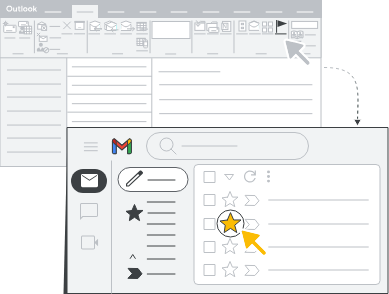
Star an email to make it stand out
From your inbox, go to the left of the message, then click Star. If the message is open, click More → Add Star.
If you have multiple stars, keep clicking the star icon until you see the one that you want to use.
View email you’ve starred
On the left side of the page, click Starred. You may need to click More first.
To find starred messages, you can also use search operators in Gmail.
To find all starred messages, do a search for is:starred.
To find all messages with a specific star, enter has: followed by the stars name. The names are based on your current star options in use:
has:yellow-starhas:orange-starhas:red-starhas:purple-starhas:blue-starhas:green-starhas:red-banghas:orange-guillemethas:yellow-banghas:green-checkhas:blue-infohas:purple-question
Snooze an email until later
Click on the checkmark next to the email in your inbox
At the top, click Snooze
 .
.Choose a later day and time to get the email.
To snooze multiple messages, select the messages and at the top, click Snooze ![]() .
.
Get rid of unimportant email
In Outlook: Ignore conversations.
In Gmail: Mute conversations.
Sometimes, you might receive an email and decide you don't want to see any more messages in the conversation. You can mute the conversation to have replies automatically skip the inbox and go directly to the archive.
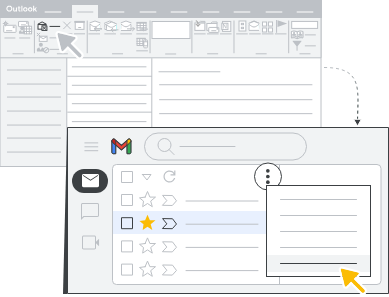
Mute email threads
Open a message.
At the top, click More → Mute or Unmute.
You can search for muted emails by doing a search for is:muted
Get rid of spam
In Outlook: Mark as email junk and choose settings for junk email.
In Gmail: Report messages as spam, move messages to the spam folder, and block senders.
Report spam
Select one or more emails
At the top, click Report Spam
 .
.
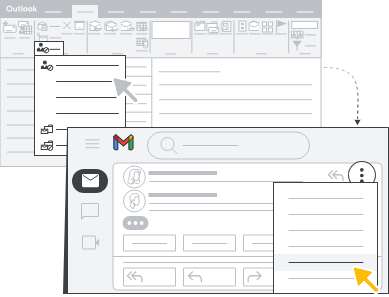
Block senders
When you block a sender, messages they send to you go to Spam.
Open the message
In the top right, click More
Click Block [sender].
If you block someone by mistake, you can unblock them by using the same steps. You can find the erroneously blocked email in Spam.
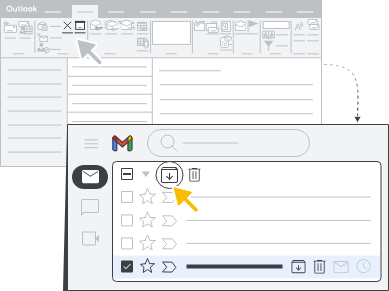
Archive email
In Outlook: Set up rules to periodically move messages from your inbox to the Outlook Archive file.
In Gmail: Archive messages, or set up filters to automatically move messages to the archive. No need to schedule rules to run at regular intervals. After you archive messages, you can still find them under the label, All Mail.
Archiving an email
Open the message you want to archive
At the top, click Archive

To archive multiple messages, you and click the box next to each message and select Archive![]() at the top.
at the top.
Finding archived email
When you search in Gmail, your results include archived messages
On the left, click More.
Click All Mail.
If you don't see All Mail or Trash, scroll to the bottom of the left sidebar and click More.
Unarchiving an email
Find the archived message via search.
Next to the message, check the box.
At the top, click Move to Inbox
 .
.
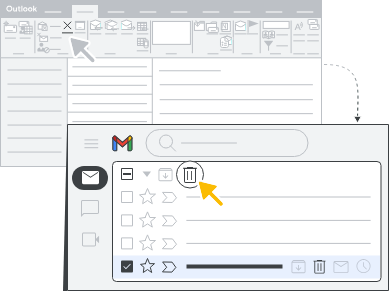
Delete email
In Outlook: Move messages to the deleted items folder and use mailbox cleanup.
In Gmail: Move messages to the trash. If you don’t see Trash, in the main menu, click More → Trash. Trashed messages are automatically deleted after 30 days.
Delete an email
On the left of each message you want to delete, check the box.
At the top, click Delete
 .
.
If you don’t see All Mail or Trash, scroll to the bottom of the left sidebar and click More.
Delete email forever
On the left, click More → Trash.
On the left of each message you want to permanently delete, check the box.
At the top, click Delete forever.
To delete all messages in your trash, in the notification, click Empty Trash now.
Recover email from the trash
On the left, click More → Trash
On the left of each message you want to recover, check the box.
At the top, click Move to
 .
.In the Move to menu, choose where you want to move the messages.
Next Section
In the next section, this guide will walk you through how to personalize your inbox.