
How to Print
Need Additional Help? If you need further assistance after reading this article, please contact the IT helpdesk via email at techsupport@baypath.edu or by phone at (413)565-1487.
All of the HP multi-function devices (MFDs) across the Bay Path and Cambridge College locations allow print jobs to be picked up wherever you are. The directions below walk you through how to print.
Student Printing Policy
Review the Bay Path Student Printing Policy by clicking here
View your Print Center Account
To view your Print Center account, including your current balances, print history, and uploading print jobs, visit https://printcenter.baypath.edu/.
Sending a Print Job from a University computer
Log in to the university computer.
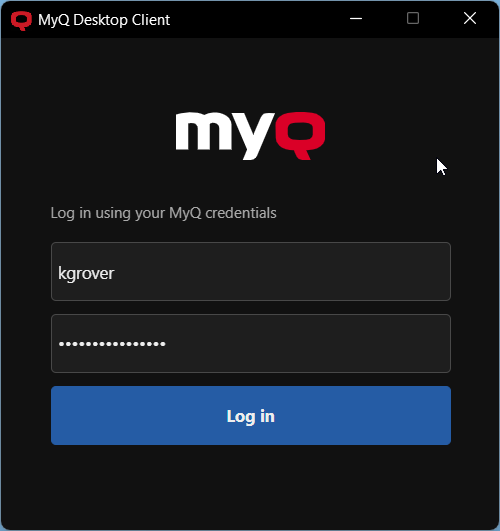
Open the MyQ Desktop Client. Click Log in.
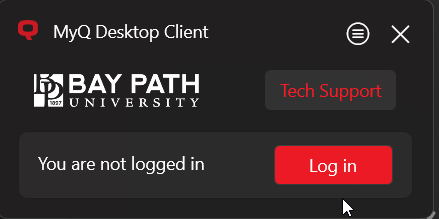
Enter your university username and password and click Log In.
For Bay Path users: Your username is everything before the @ symbol in your Bay Path email. (For example: fphant@baypath.edu has a username of fphant)
For Cambridge College users: Your username is firstname.lastname. (For example: fiona.phant00@go.cambridgecollege.edu has a username of fiona.phant)
Open the document you wish to print.
From the Print menu, select the appropriate print queue.
Faculty/Staff: FacultyStaff-Printer
Students: Student-Printer
Sending a Print Job from a personal device
Print jobs can be sent from practically any personal device (laptop, cell phone, tablet, etc) using these instructions.
Releasing a Print Job
If it's your first time using a printer at a Bay Path University or Cambridge College location, you will need to register your ID with your account. You can learn how to do so here.
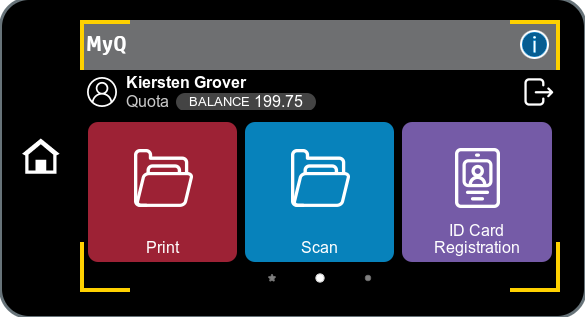
Walk up to the nearest public printer and tap your University ID card on the provided card reader.
Tap Print.
Tap Release Print Job(s) to immediately release all your pending jobs.
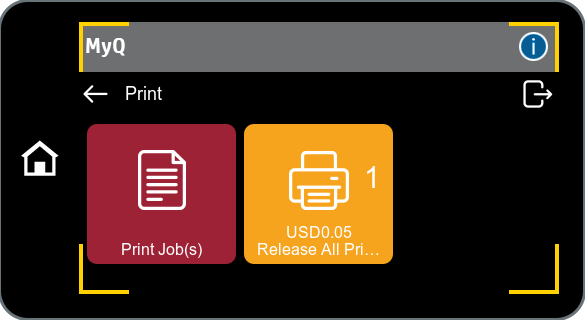
You can tap Print Jobs to view all your pending jobs and choose which ones to print.
Your print job(s) will be shown on the display of the printer.
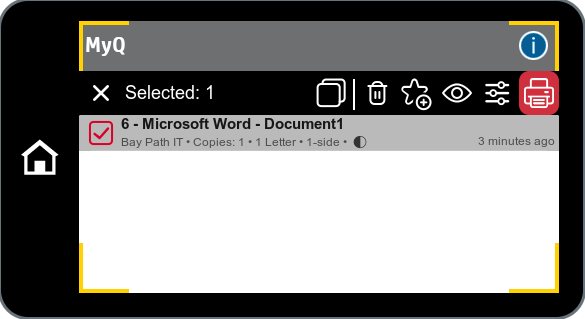
Select your job and tap the red Printer icon in the top right corner of the screen.
If you wish to see additional details or make changes to the copy count or budget to be charged, tap the three lines to the left of the printer icon. Increasing the copy count will increase the cost of the job.
Additional options include:
Duplex: Duplex (double-sided) on short edge, Duplex (double-sided) on long edge, Simplex
Staple: Choose if you want staples and where they are located
Punch: Choose how many hole punches you want
Copies: Choose how many copies you want printed